How to make a Charcuterie Board:-
Charcuterie boards are a lovely way to bring people together. Whether you’re having a dinner party, a special event, a party at Christmas or just with friends and family it’s a great way to make any event extra special. It’s made up of a range of cured meats, cheeses, fresh fruits, nuts, crackers, dips and more!
There are no rules to making a Charcuterie Board and you can really personalize it to your liking. Make it simple and cheap or fancy! There are endless options.
If you want to know how to make an amazing looking Charcuterie Board then this guide will show you exactly how! You’ll find out how to choose your ingredients, how to arrange everything and balance all the flavors.
What is a Charcuterie Board is a platter traditionally served with cured meats, cheeses and accompaniments. Charcuterie comes from a French word meaning the curing and preserving of meats, particularly pork.
Over the years charcuterie boards have become very creative and now include many more elements to them. Most charcuterie boards will include a mixture of sweet and savory, crunchy, creamy and tangy foods.
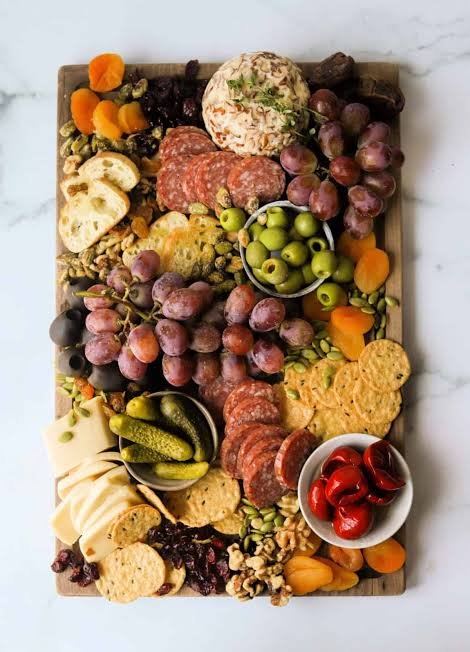
How to make a Charcuterie Board:-Traditional charcuterie boards will include:
Cured meats – Salami, Prosciutto and Pepperoni.
Cheeses – A variety of cheeses.
Crackers, Bread and Breadsticks.
Fresh Fruits – Grapes, Strawberries and Apples.
Dried fruits – Apricots, Raisins and Dates.
Nuts – Almonds, Walnuts and Pistachios.
Olives, Pickles and other savory accompaniments.
Dips, Spreads, Honey and Jam.
Everything should be balanced so the flavors and textures are nice.
Step 1: Choose your Charcuterie Board
The first thing to do is choose your Charcuterie Board. This is the base to your board so ensure you choose the correct size.
Wooden boards are a classic option. They have a rustic look and come in many shapes and sizes. Great for a casual or elegant event.
Marble boards have a more elegant and modern look. They’re great for formal events and you can keep your cheese cooler for longer.
Slate boards have a dark base so your colors will pop. A great option for a stylish board.
Large Platter – If you don’t have a traditional board then you can use a large ceramic or glass platter.
Ensure you choose the right size for the number of people you’re having. A small board will work for up to 4 people. If you have more people then you may need a larger platter.
Ensure your board is clean, dry and food safe.
Step 2: Choose your Cheese
Cheese is one of the most important parts of your Charcuterie Board. Choose a variety to give more flavour and texture.
Ideally choose between 3-5 different cheeses.
Some popular options include:
Brie – A soft, creamy cheese with a mild buttery flavour.
Cheddar – A firm cheese with a rich and slightly sharp flavour.
Gouda – A smooth cheese which is mild or caramel flavoured depending on how old it is.
Blue Cheese – A strong and tangy cheese.
Goat Cheese – A soft cheese with a fresh and slightly tangy flavour.
Manchego – A firm Spanish cheese with a nutty and savory flavour.
Try to include a mix of soft, semi-soft and hard cheeses to give variety.
Hard cheeses can be cubed or sliced to make them easier to serve. Soft cheeses can be served in wedges or small amounts using a cheese knife.
Remove the cheese from the fridge 20-30 minutes prior to serving depending on the cheese and room temperature. Remember to think about food safety and don’t leave perishable foods out for too long.
Step 3: Add a variety of Cured Meats
Cured meats are the traditional center piece of a Charcuterie Board. They provide savory and salty flavours to compliment your cheeses.
Try to choose between 2-3 different meats.
Some popular options include:
Salami – A tasty cured meat which is easy to arrange. Goes well with crackers and cheese.
Prosciutto – An Italian ham which is finely sliced. Has a delicate texture and slightly salty flavour. Looks great when rolled up into small rolls.
Pepperoni – Provides a familiar and slightly spicy flavour. Goes well with the cheddar and crackers.
Soppressata – An Italian cured sausage. Provides a rich and savoury flavour.
Turkey/Chicken Slices – Great alternative for those who like a milder meat.
Roll up or fold your thin slices of meat to make your board look nice. You can create small meat roses by rolling up your slices.
If you have any guests with dietary requirements then you could make a separate vegetarian section or even a meat free board.
Step 4: Add Fresh and Dried Fruits
Fruits will provide a natural sweetness to your board. They look great and will compliment the salty and rich flavours.
Fresh fruits will give your board a vibrant look.
Some great options include:
Strawberries
Grapes
Blueberries
Raspberries
Apple Slices
Pear Slices
Orange Segments
Fresh Figs
Melon Cubes
Dried fruits are also great to add. They have a concentrated sweetness and chewy texture. Try adding some dried apricots, dates, cranberries, raisins or dried figs.
Place small bunches of grapes around the edge of your board. Fill any gaps with berries or sliced fruits.
If you are using apples or pears try to prepare them just before serving so they don’t go brown. Sprinkle with some lemon juice to help keep their colour.
Step 5: Add Crackers, Bread and Crunchy Foods
Crackers and bread are perfect to use as a base for your cheese, meats, dips and spreads. They’ll provide a nice crunch.
Try to include at least 2-3 different options.
Some good options include:
Water crackers
Wholegrain crackers
Multigrain crackers
Sourdough Slices
Baguette Slices
Breadsticks
Pretzels
Pita Chips
Choose crackers with different shapes, flavours and textures.
Arrange your crackers into neat rows, towers or circular overlaps. Place your bread slices either down one side of your board or in a separate basket.
Don’t place all your crackers next to wet foods as they’ll get soggy.
Step 6: Add Nuts, Olives and Pickle
Small savoury foods will help to complete your board. They will provide interesting textures and salty, tangy and crunchy flavours.
Nuts are great to add as they’ll fill in the small gaps.
Try adding:
Almonds
Walnuts
Pistachios
Cashews
Pecans
Add some tangy foods such as olives, cornichons, pickled onions or pickled foods.
Olives go well with cured meats and firm cheeses. Pickles will provide a tangy flavour to compliment rich and creamy foods.
Place your small foods into mini bowls.
Step 7: Add Dips, Spreads, Honey and Jam
Dips and spreads will help to make your board more exciting with extra flavours.
Mix sweet and savoury.
Some lovely options are:
Honey – Goes well with Brie, Goat Cheese and Blue Cheese.
Fig Jam – Has a sweet flavour with a slight fruitiness. Goes well with many cheeses.
Fruit Preserves – Strawberry, Raspberry and Apricot preserves are great options.
Hummus – Provides a creamy savoury option. Goes well with crackers and vegetables.
Mustard – Wholegrain mustard goes well with cured meats. Provides a sharp flavour.
Pesto – Provides a fresh herby flavour. Goes well with bread and cheese.
Use small bowls or ramekins to serve your dips and spreads. Place around your board.
Step 8: Style your Board
Now you’ve chosen all your ingredients it’s time to put everything together. This will create an attractive centre piece.
You don’t need to be a styling expert. Just follow a few tips to create a beautiful board.
Start with your large foods. Place your cheese wedges, dips in bowls and larger foods evenly.
Add your cured meats. Place your folded meats around your cheese. Try different ways to fold your meats to create interesting shapes.
Add some crackers. Group your crackers and bread around the board. Don’t overload one section.
Add your fruits and vegetables. Use your fresh fruits to add some colour. Place near your cheeses and meats which compliment the flavour.
Add your small foods. Add some nuts, dried fruits, olives and berries to fill any gaps.
Finally add some finishing touches. Add some fresh herbs such as rosemary, thyme, edible flowers or small sprigs of mint.
Try to avoid making your board too straight. Using curves, overlaps and varying heights will create a more interesting look.
Step 9: Balance your Flavours
Your board should not only look nice but also taste nice. Aim to include 5 main flavour and texture groups.
Salty – Cured meats, olives and salted nuts.
Sweet – Fresh fruits, dried fruits, honey and jam.
Creamy – Brie, Goat Cheese and soft dips.
Crunchy – Crackers, nuts and breadsticks.
Tangy – Pickles, mustard and blue cheese.
This will create a more enjoyable eating experience.
Try to create some small flavour combinations. Brie, honey and strawberries provide a sweet flavour combination whereas cheddar, salami and wholegrain mustard provide a savoury combination.
Having a variety of foods will allow your guests to try different combinations.
Step 10: Serve your Charcuterie Board
Whilst presentation is important you should always think about food safety.
Ensure your cheese, cured meats and other perishable foods are kept in the fridge until you’re ready to assemble your board. Use separate utensils for each food, especially if you have any guests with allergies or dietary requirements.
As a general rule don’t leave your perishable foods out for longer than 2 hours. If the temperature is over 90°F (32°C) then don’t leave out for longer than 1 hour.
If you’re making your board in advance then wash and cut your suitable fruits. Portion your foods into containers and place in the fridge. Assemble your board nearer to serving time.
Any leftover foods should be placed into airtight containers and placed in the fridge. Throw away any foods that have been left out for longer than they should have.
How to make a Charcuterie Board:-Top Tips for a Cheap Charcuterie Board
You don’t need to spend a fortune on gourmet foods to create a beautiful Charcuterie Board. With some careful planning you can create an impressive board.
Top tips to save money:
Buy block cheeses.
Choose seasonal fruits as they’re often cheaper.
Use local nuts and dried fruits.
Choose 2-3 meats.
Use affordable crackers, breadsticks and homemade dips.
Use foods you already have in your kitchen.
Use a reusable platter.
Create a themed board using local foods. For example a Mediterranean theme could include olives, hummus, pita bread, cucumber, grapes and a variety of cheeses.
How to make a Charcuterie Board:-Common Mistakes
A simple Charcuterie Board can look unbalanced if you do the following:
Too many ingredients – Don’t overload your board. Try to include a variety.
Only one cheese – Try to include a variety of cheeses for more interesting flavours.
No serving utensils – Ensure you have cheese knives, small spoons and tongs.
Not considering food allergies – Label foods which contain common allergens such as nuts, dairy and gluten.
Prepared too early – Your fresh foods may not look as nice.
Leave gaps – Fill in any small gaps with berries, nuts or dried fruits.
How to make a Charcuterie Board:-Conclusion
Learning how to make a Charcuterie Board is a fun way to enhance your entertaining skills. By including the right combination of cheeses, cured meats, fresh fruits, crackers, nuts, dips and more you can create a beautiful board for almost any occasion.
The key to creating a great Charcuterie Board is to balance the flavors, textures, colors and presentation. Start with a suitable platter, place your larger foods first then fill in the gaps with your smaller foods. Finally add some finishing touches.
Most importantly there isn’t one ‘right’ way to make your board. Get creative with your ingredients and try new flavor combinations. Personalize your board according to your guests.
Whether you’re making a small snack board or an impressive center piece a homemade Charcuterie Board is an easy and elegant way to make any gathering more memorable.